Search Results for ‘(“C’
-
Search Results
-
swirth on October 31, 2011 at 3:40 pm
Taco Dip
Submitted by: KathyD• 1 - 1 1/2 lbs ground beef
• 1 pkg taco seasoning (can be mild, med or hot)
• 1 12-16 oz jar salsa
• 1 can refried beans
• Cheese for the top!Scramble and cook the hamburger until it's done. Drain the fat and add the taco season to the meat. Toss it around and coat it well. Then add the jar of salsa and the can of refried beans. Mix until thoroughly combined. Put mixture in a pie plate or an oven proof dish that not too deep. Top with cheese and bake in a 350° oven until the cheese is melted.
I usually use Monterrey Jack cheese but Cheddar or Pepper Jack is nice too.
This can be made ahead and refrigerated until the Superbowl. If I make this ahead I do not top it with cheese and refrigerate covered with foil. I then throw the dip still covered with foil in the oven for 10-15 min. Then I remove the foil and top with the cheese and continue baking until the cheese is melted and its heated all the way through.If you have leftovers the next day it's pretty good on a baked potato or over hot dogs for chili dogs!
-------------------------------
reply by: Mrs Cindy on October 28, 2011 at 11:36 pmThis is a really odd sort of dip. A friend brought it over, he uses it as a topping on his cheesecake, but we have used it for so many other things. Great on anything you would use in a chocolate fountain. Fruit, cake cubes, cookies, pretzels. Sounds weird, but very good. You can adjust the consistency by using more or less milk. He calls it The Liquidy Substance. We call it The White Chocolate Sauce! 🙂
~Cindy
White Chocolate SauceIngredients:
1 sm pk white chocolate instant pudding
1 tsp Vanilla extract
1 can Borden eagle brand sweetened condensed milk
Milk (up to 1 cup)Directions:
Make pudding as directed. Add can sweetened condensed milk, vanilla extract and enough milk to reach the consistency you want. Beat for 2 min. Add more milk if needed.
-------------------
reply by: Mike Nolan on October 28, 2011 at 12:18 pmI have a spinach-artichoke dip posted in my recipes.
It does not have garlic in it, IMHO it is not needed! This dip is one that several people have requested I make in bulk for them, along with cocktail rye bread. I use artichoke hearts that I get in large jars at Sams Club, these are NOT marinated in oil and spices. The ones you get in cans taste metallic.
Then of course there's the old standby from the 1960's:8 ounces Philadelphia cream cheese
1 jar Kraft Roka Blue Cheese spread (available again)
1 jar Kraft Old English Cheese spread
1 jar Kraft Pimento Cheese spread
Mix in a mixer or food processor. Best if mixed, refrigerated, and allowed to warm back up again.My son LOVES to mix this cheese dip with salsa.
My wife had a Pampered Chef party this summer where she made a (garlic-free) black bean dip:
1 can of black beans
1 can of diced tomatoes
3 tablespoons of jalapeno peppers, diced.
We use a food processor or stick blender to chop everything up. Serve warm.
----
by: Sheryle on October 28, 2011 at 12:10 pmHere a couple of my favorites. Will try to add a few more later.
Pumpkin Dip
1 package cream cheese, (8oz.) softened
2 cups confectioners' sugar
1 can pumpkin, (15 oz.)
1 Tbs pumpkin pie spice
1 tsp orange extract
1/2 tsp ground ginger1. In a food processor, blend cream cheese and confectioners' sugar until smooth. Remove cover, add pumpkin and remaining ingredients. Blend thoroughly.
2. Chill 30 minutes or until ready to serve. Serve with Gingersnap cookies. May also be served with Red Delicious apples or pears, cored and cut into slices. Toss fruit with a little lemon juice mixed with water to prevent browning.Yield: 2.5 cups
--------
Onion Dip2 large yellow onions
4 Tbs unsalted butter
1/4 cup vegetable oil
1/4 tsp ground red pepper
1 tsp kosher salt
1/2 tsp freshly ground black pepper
4 oz cream cheese, at room temperature
1/2 cup sour cream
1/2 cup mayonnaise1. Cut the onions in half and then slice them into 1/8-inch thick half-rounds. (You will have about 3 cups of onions.) Heat the butter and oil in a large sauté pan over medium heat. Add the onions, cayenne, salt, and pepper and sauté for 10 minutes. Reduce the heat to medium-low and cook, stirring occasionally, for 20 more minutes until the onions are browned and caramelized. Allow the onions to cool.
2. Place the cream cheese, sour cream and mayonnaise in the bowl of an electric mixer fitted with the paddle attachment and beat until smooth. Add the onions and mix well. Taste for seasonings. Serve at room temperature.
---------
reply by: cwcdesign on October 28, 2011 at 9:36 amHere are a couple of dips we like. The Caramel dip is great with strawberries, but also pineapple chunks, grapes, apples.
Caramel Dip for Fresh Fruit
1/4 cup butter
3/4 cup brown sugar
8 ounces sour cream
1 tsp vanillaMelt butter and brown sugar together. Stir in sour cream and vanilla.
Stir over medium heat until smooth. Place in refrigerator for a few
hours to thicken. Serve with fresh fruit
----------
This one is quick and easy and you can have the ingredients on handWhite Bean Dip with Rosemary
yield: 1 1/2 cups
1 15-ounce can cannellini beans, rinsed and drained
1/4 cup olive oil, more for drizzling
2 tbl. lemon juice
1 teaspoon fresh rosemary, chopped (or fresh thyme)
1 small garlic clove, minced
salt to taste
freshly ground, pepper to tastePuree all ingredients in a food processor (will fit in a mini) until smooth. Pour into
serving bowl and drizzle with olive oil. Serve with baguette, pita chips or crudites.Garnish with rosemary (thyme) sprigs if desired.
*I like to let it sit for a while to meld the flavors
*You can use dried herbs in a pinch, but it is not as good
-------------------------
reply by: elsa on October 27, 2011 at 9:29 pmHere is an Artichoke Dip which we like:
1 cup mayonnaise
1 cup grated Parmesan cheese
2 (6.5) oz jars marinated artichoke hearts, drained
2 cups shredded mozzarella cheese
1 1/2 teaspoons garlic powder
1 teaspoon paprikaPreheat oven to 350 degrees
In a large bowl, thoroughly mix the mayonnaise, Parmesan, artichokes, mozzarella and garlic powder. Transfer the mixture to an 8 x 8 inch baking dish.
Bake 30 minutes or until the surface is lightly browned and bubbly.
Sprinkle with paprika and serve warm.I like to bake this dip in an attractive, ceramic pie pan.
One of the first times I served it, it disappeared quickly and a guest brought the empty dish back to the kitchen saying, "No one liked this!"
------------------------
reply by: RonB on September 16, 2012 at 7:46 pmHere's a simple dip:
ONION DIP
1 pkg Lipton's Beefy Onion Mix
1 pt sour cream
1 heaping tbs mayoMix and let sit for at least 30 min, (if you can - LOL).
Serve with your favorite chips, vegis, or even with pretzels.
Ron
-----------------------
White Bean Dip with PitaSubmitted by: sweetielola
White Bean Dip with Pita Chips
Recipe courtesy Giada De Laurentiis
1 (15-ounce) can cannellini beans, drained and rinsed
1 clove garlic
2 tablespoons fresh lemon juice
1/3 cup olive oil, plus 4 tablespoons
1/4 cup (loosely packed) fresh Italian parsley leaves
Salt
Freshly ground black pepper
6 pitas
1 teaspoon dried oreganoPreheat the oven to 400 degrees F. (I do 375)
Place the beans, garlic, lemon juice, 1/3 cup olive oil, and parsley in the work bowl of a food processor. Pulse until the mixture is coarsely chopped. Season with salt and pepper, to taste. Transfer the bean puree to a small bowl.
Cut each pita in half and then into 8 wedges. Arrange the pita wedges on a large baking sheet.
Pour the remaining oil over the pitas. Toss and spread out the wedges evenly. Sprinkle with the oregano, salt, and pepper. Bake for 8 to 12 minutes, or until toasted and golden in color. Watch carefully.
Serve the pita toasts warm or at room temperature alongside the bean puree.
----------------
Spinach Artichoke DipSubmitted by: nloxford
• 1 can quartered artichoke
• 1/2 box frozen chopped spinach, thawed and drained
• 2 packages (3 ounces) parmesan cheese (not the stuff in the box)
• 1 cup sour cream
• 1 cup mayonaise
• garlic powder for seasoningYou can bake it in an 8 or 9 inch pan at 350 until nice and bubbly. I usually do it in a 9 by 13 (it cooks faster)
--------------------------
Queso cheese spinach dipSubmitted by: nloxford
• 5 lbs of white American cheese
• 1 quart of half and half
• 1 pint of whipping cream
• 1 box of spinach, thawed and drained
• 1/2 - 1 cup of chopped jalapenoMelt the cheese then add the rest of the ingredients. I use my biggest crock pot. It fills it up completely.
This dip is outstanding even non spinach eaters like it and it makes a huge amount.
-----------------------------
Pumpkin DipSubmitted by: carla
• 8-oz Cream Cheese, Softened
• 2 C Powdered Sugar (make sure there are no lumps)
• 15-oz Can Pure Pumpkin (Not pumpkin pie mix)
• 1 tsp Ground Ginger
• 1 tsp Allspice
• 2 tsp CinnamonBlend cream cheese and sugar together; mix in remaining ingredients. Makes about 3 cups.
Great with:
Ginger Snaps
Graham Stix
--------------------
Pepperoni Pizza DipSubmitted by: lsb
• 1 8-oz. pkg. cream cheese, softened
• 1/2 cup sour cream
• 1 tsp. oregano
• 1/8 tsp. garlic powder
• 1/8 tsp. crushed red pepper
• 1/2 cup pizza sauce
• 1/2 cup pepperoni, chopped
• 1/4 cup green pepper, chopped
• 1/4 cup green onion, choppped
• 1/2 cup mozarella cheeseBeat together first five ingredients. Spread into a 9 inch pie pan. Spread pizza sauce over top. Sprinkle with pepperoni, green pepper, and green onion. Bake for 10 minutes at 350 degrees. Top with cheese and bake for an additional five minutes. Serve with tostitoes.
--------------------------
Fruit Dip...A.K.A Cream Cheese DipSubmitted by: carla
• 2 C Marshmallow Cream
• 8-oz Cream Cheese, Softened
• 1 T Orange Rind
• Dash of Ginger, optional but goodGradually add marshmallow creme to softened cream cheese. Mix well. Add the orange rind and ginger. Whip until fluffy. Serve with fresh fruit.
Great with:Apples
Grapes
Bananas
Pears
Strawberries
Graham Stix
Ginger Snaps
---------------------
Dillweed DipSubmitted by: naschol
I got this recipe many years ago out of a cookbook. It has always been a big hit served with lots of vegetables for dipping.
• 3/4 cup mayonnaise
• 3/4 cup sour cream
• 2 tbsp. minced onion flakes
• 2 tsp. Spice Island Beau monde seasoning
• 2 tsp. dill weedMix and serve with chips or vegetables. Tastes best when made ahead.
-------------------------------
Curry DipSubmitted by: CWalde
This is a great veggie dip. Cheryl
• 1 c mayonnaise
• 1/2 c sour cream
• 2 T green onion slices
• 1 t curry powder• Combine ingredients; mix well. Serve with chips or fresh vegetable dippers. Serve with a platter of assorted vegetables. Makes 1 1/2 c.
---------------------------
Caramel Apple DipSubmitted by: carla
• 8-oz pkg Cream Cheese, Softened
• 3/4 C Brown Sugar, Packed
• 1/2 C Butter, Softened
• 1 tsp VanillaCombine all, mixing well. Refrigerate for 2 hours. Makes 2 cups
---------------------
Black Bean and Roasted Red Pepper Dip
Submitted by: CWalde• We made this for Superbowl Sunday. This is so easy! I love beans and I have to say that it was hard to stop eating this. I think you'll love it. Cheryl
• 1 pkg. Lawrys taco spices and seasonings
• 1 can (15 oz) black beans, drained
• 1 jar (7 oz) roasted red peppers, drained
• 12 oz. cream cheese
• 1 T chopped cilantro
• 1-2 t. lime juice• garnishes---chopped tomoato and fresh cilantro
• In food processor combine all ingredients except garnishes, mix thoroughly. Serve with tortilla chips and/or assorted raw vegetables. Makes 1 1/2 c Only takes 10 minutes to prepare!
-------------------------
Bacon-Horseradish DipSubmitted by: CWalde
• This is my absolute favorite dip! I like to add a bit more garlic salt to taste though. Hope you enjoy! Cheryl
• 1 (8oz) pkg cream cheese
• 2 T prepared horseradish
• 1 c sour cream
• 3 t finely cut chives
• 8 strips bacon, cooked crisp
• dash of garlic salt or more to taste
• dash of red pepper• Soften cheese at room temperature. Blend with horseradish, sour cream, and chives. Crumble bacon; add half to mixture. Season with garlic salt and pepper. Sprinkle remaining bacon over top of dip.
-----------------------------------
Vegetable and Chip DipSubmitted by: CWalde
• This is one of the easiest dips. It has a strong garlic flavor and I love it. If you would like it less strong, add more mayo and sour cream, but I like it as is. May substitute unflavored yogurt for sour cream for a lighter version. Cheryl
• 1 (6oz) pkg dry Good Seasons Italian dressing mix
• 1/4 c mayonnaise
• 1 pt. sour cream• Mix thoroughly. Use with any chip and vegetable. Suggestions are: cauliflower, broccoli, cucumber, carrots, jicama, chickory, celery, mushrooms, radishes, multi colored peppers, blanched green beans or asparagus.
-------------------------
Creamy Spinach Dip and Artichoke DipSubmitted by: grandmoogie
I found these recipes in my crock pot book.They look really good! -Moogs
CREAMY SPINACH DIP
12oz cream cheese,cubed
1/2C heavy whipping cream
10oz frozen chopped spinach
1 envelope dry onion soup mix
1 tsp prepared hot sauce
1/2C green onios, finely sliced
1tsp fresh lemon juiceCombine the cream cheese and whipping cream in crock pot. Cover and heat on High until the cheese is melted. about 45 min. Add spinach,soup mix and prepared hot sauce, and stir thoroughly. Cover; cook on high for 30min Shortly before serving, add the green onions and lemon juice and mix thoroughly again.
-----------------------------
ARTICHOKE CHEESE DIP1 lb.Mozzarella cheese, shredded
1C Parmesan cheese, grated
1C mayo
1C artichoke hearts, drained and chopped
1 red pepper, seeded and finely chopped
2 cloves garlic, mincedAdd all ingredients to the crock pot and mix thoroughly. Cover; cook on high about 1 hour. Makes enough dip for 15 people.
-------------------------
Berry Good Fruit DipSubmitted by: hickeyja
• 1 cup strawberries, fresh or frozen that have been thawed
• 3/4 cup fat-free vanilla yogurt
• 1/2 tsp ground cinnamon
• 1/4 tsp ground ginger
• 1/2 of 8-ounce container frozen light whipped topping, thawed
•
• Apple wedges, pear wedges, canned pineapple chunks (drained) or other fruit suitable for dipping.1. Place strawberries in a blender or food processor. Cover and blend or process till smooth.
2. In a bowl, stir together strawberries, yogurt, cinnamon and ginger. Fold in dessert topping. Chill for up to 24 hours. Serve with fruit dippers.Makes 12 servings
Per serving (without fruit): 38 cal., 1g fat, 6g carbs, 1mg cholesterol, 17 mg sodium
------------------------
Blue Cheese DipSubmitted by: hickeyja
This recipe, from http://www.williams-sonoma.com, pairs potato chips and vegetables with blue cheese.
• 1/2 of an 8-ounce package of cream cheese
• 1 cup sour cream
• 4 ounces blue cheese
• 2 Tbsp chopped fresh chives
• Potato chips or cruditésIn bowl, using electric mixer, beat cream cheese on medium speed until sort and creamy. Reduce speed to low, add sour cream and beat until combined. Add blue cheese and beat until cheese is crumbled and no large lumps remain. Stir in chives and pepper.
Transfer dip to small serving bowl, cover with plastic wrap and refrigerate at least 30 minutes or up to 1 week.
Serve with potato chips or crudités.
Makes about 2 cups.
-------------------------------------
Artichoke DipSubmitted by: macy
• 1 can artichokes (canned not marinated), mashed
• 1 cup mayo (quality counts here)
• 1 cup grated parmesan cheese (the "sawdust" kind like Kraft in the can seems to melt the smoothest without separating)Stir together. Place in oven-safe dish. Heat gently in the oven or microwave.
The oil will separate if you bake too long, so just til heated through and starting to brown lightly on top.
Serve with buttery crackers.
----------------
"International" Sun-dried Tomato DipSubmitted by: datadame
I begged this recipe from a friend after having it at her house. My son, a student at University of Alabama at Birmingham, loved it and asked me to make a double recipe for him to take to a party for international students. He also asked me to write out the recipe. The dip was a huge hit. Students from all over the world took digital pictures of the recipe card, and emailed their friends and families.
It was several weeks before I shared this with my friend only to discover she'd taken the recipe from one of Ina Garten's books. So Ina, if you run across a recipe for "Donna's Sun-dried Tomato Dip" and it looks familiar . . . it is.
• 1/4 C. sun-dried tomatoes in oil, drained and chopped
• 8 oz. cream cheese at room temperature
• 1/2 C. sour cream
• 1/2 C. mayonaise
• 10 dashes Tobasco sauce
• 1 tsp. Kosher salt
• 3/4 tsp. ground pepper
• 2 scallions, thinly slicedPuree everything except the scallions in a food processor or blender.
Add scallions and pulse twice. Serve at room temperature.
Goes well with pita triangles, bagel chips, or lavash crackers (Peter Reinhart has a good recipe in BBA).
-----------------------------------------
Feta Black Olive DipSubmitted by: hickeyja
This recipe, courtesy of Graasch Foods in Brookfield, WI, is a popular offering the store’s deli case.
• 1 pound crumbled plain feta cheese
• 1 cup pitted whole black olives, drained well
• 1 tsp garlic powder
• 1/4 tsp dried thyme
• 1 to 1 1/3 cup mayonnaise
•
• Pita triangles or small French bread roundsCombine feta cheese, black olives, garlic powder and thyme in food processor and process until finely chopped. Add enough mayonnaise to make mixture a spreadable consistency.
Serve with pita triangles or small French bread rounds. Makes 3 cups
-------------------------------------
Shrimp and Avocado DipSubmitted by: hickeyja
Serve this tangy dip with tortilla chips, suggests “The Big Book of Potluck” by Maryana Vollstedt.
• 1 pound cooked small bay shrimp
• 1 large avocado, peeled and diced
• 2 ounces crumbled goat cheese, such as Montrachet
• 1 cup thinly sliced green onions, including some of the tender green tops
• 1/4 cup chopped cilantro or parsley
• 1 Tbsp lemon juice
• 2 Tbsp olive oil
• 1/2 cup chili sauce
• 1/4 tsp salt
• 1/4 tsp ground pepper• Tortilla chips
Put shrimp, avocado, cheese, green onions and cilantro in medium bowl.
In a small bowl, whisk together lemon juice, olive oil, chili sauce, salt and pepper. Add to shrimp mixture and toss lightly.
Serve with tortilla chips.
Makes about 4 cups of dip.
--------------------------------
Wisconsin Asiago and Artichoke DipSubmitted by: hickeyja
Asiago cheese is a hard cheese with a taste similar to aged cheddar and Parmesan. This recipe, from the Wisconsin Milk Marketing Board, recommends Asiago cheese made in Wisconsin.
1 1/2 cups finely grated Wisconsin Asiago cheese
1 package (8 ounces) cream cheese, room temperature
1 1/4 cups oil-packed sun-dried tomatoes, drained and chopped
2 Tbsp chopped parsley
1/4 tsp freshly ground black pepper
1 can (14 ounces) artichoke hearts, drained and choppedToasted French bread rounds or rye chips
Preheat over to 350ºF.
In a small mixing bowl, combine Asiago and cream cheese; blend thoroughly. Add tomatoes, parsley and pepper and blend. Stir in artichokes.
Place in 1-quart casserole dish or ovenproof container. Bake in preheated oven about 25 minutes or until hot.
Serve with bred rounds or rye chips.
Makes 6 to 8 servings.Note: For a creamier dip, add 2 to 4 tablespoons additional cream cheese or mayonnaise before baking.
--------------------------------------------
Grandmoogies Yummy Bean DipSubmitted by: grandmoogie
This dip is a hit at any party or picnic!
30oz can refried beans
6 tablespoons salsa
3 ripe avacados
1 1/2 T lemon juice
1/2 teas. ea. salt & pepper
3/4 cup sour cream
3 tablespoons mayo
1/2 teas. garlic powder
2 sm cans black olives, drained ,save some for top
3 med. tomatoes, coarsely chopped
3 green scallions, finely diced
8oz or 1C shredded sharp cheddar cheese#1-Blend in bowl beans and salsa spread in a shallow platter.
#2-Mix well avacados,lemon juice,salt& pepper(spread on above layer)
#3-Mix sour cream, mayo, and garlic powder(spread on above layer)
#4-Mix blk olives, tomatoes,and scallions(spread on above layer)
#5-Sprinkle cheese(evenly on above layer)
#6- top with remaining black olivesRefrigerate at least one hour.
Serve with tortilla chips
Enjoy-Moogs
----------------------------------
Kim's Cheese DipSubmitted by: navlys
Caution: This dip can become addictive.
• 8 oz. sour cream
• 1/2 cup of mayonnaise (light)
• 2 Tbls. flour
• 1/2 to 1 tsp minced garlic
• 1 1/2 cups shredded Monterey Jack cheese with jalapenos• Garnish:
• 1 2 oz jar pimento chopped
• 1/4 c sunflower seeds
• 1 sliced scallion (green part)
•
• Stir all dip ingredients together. Turn into a 7" microwave-safe dish. Cook uncovered on med-hi power for 4-6 minutes, stirring twice. Garnish as desired. Serve with crackers or bread slicesTopic: Bread we had in Italy
Bread we had in Italy
webby1066
Hope you folks can help!
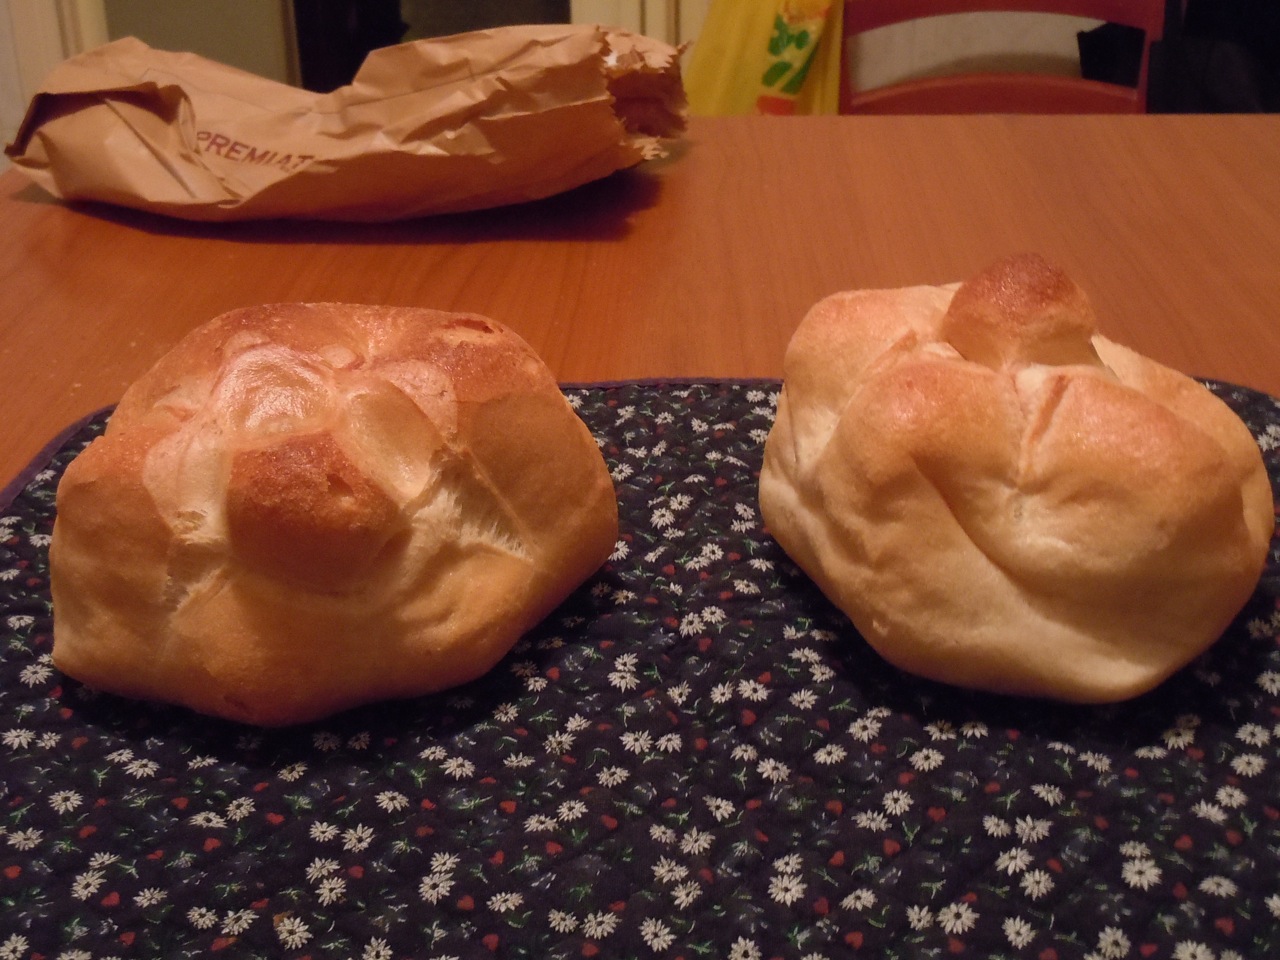
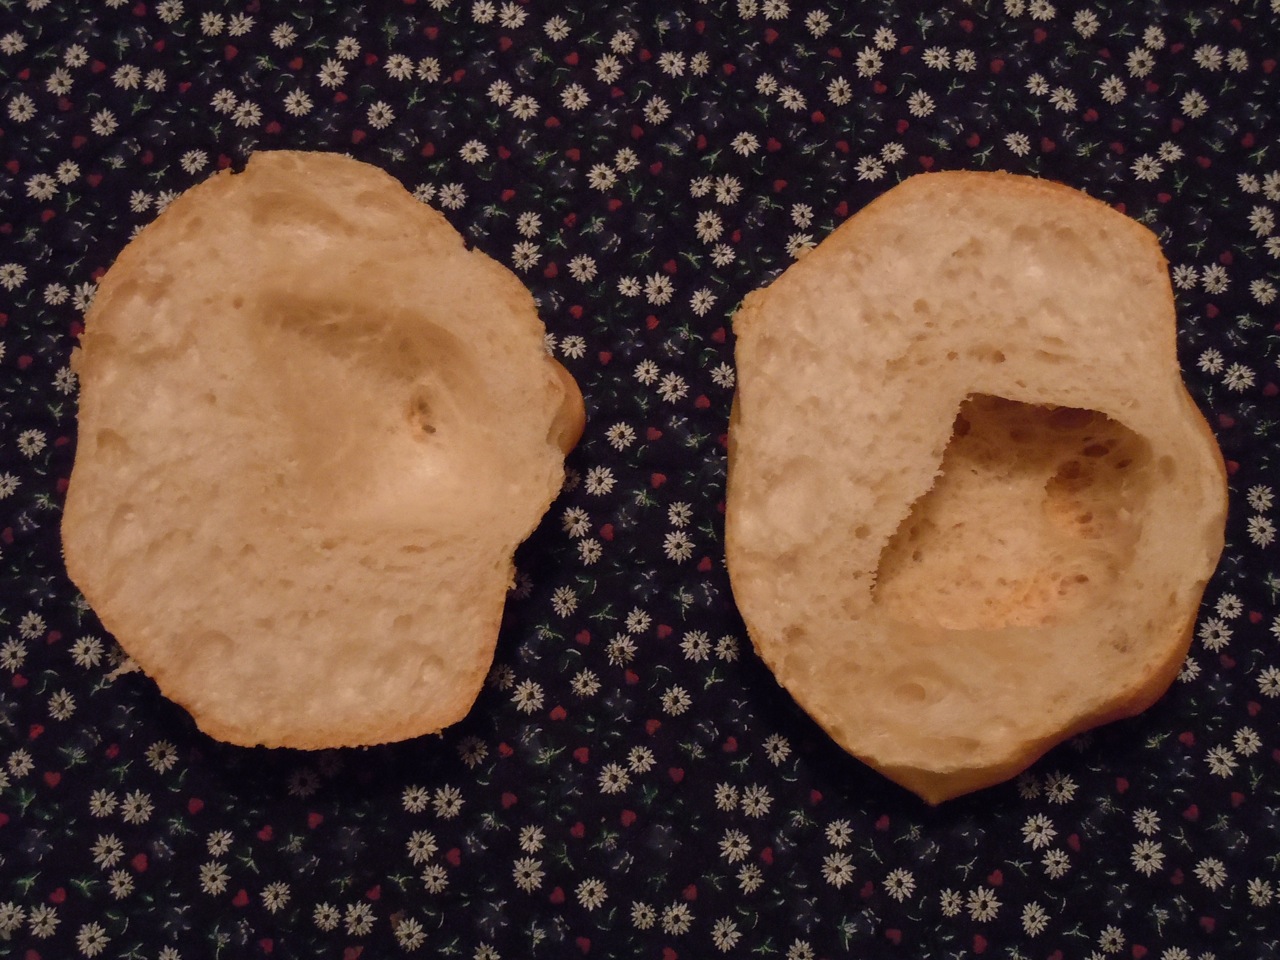
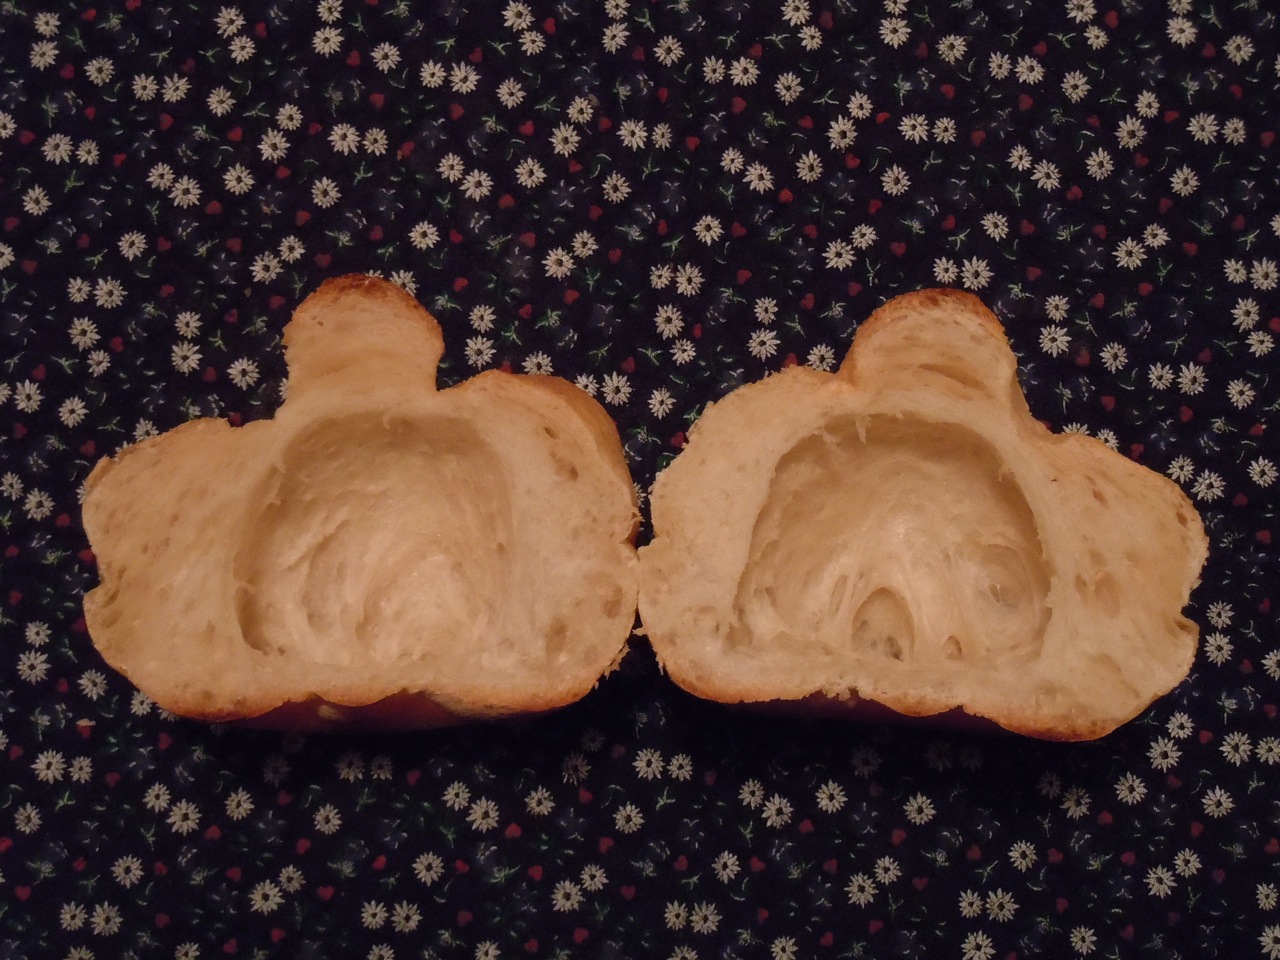
When hubby and I went to Italy we had the most wonderful hard, crusty rolls for breakfast. They were basically hollow inside so you could add lots of butter and jam. The crust itself held everything with no "filling". I am a fan of crusts preferably with as little bread as possible.
I've tried a lot of recipes including "artisan" ones that seem to promise high rise crusts, but without the resulting texture I'm searching for. I even tried popovers, but they didn't give me what I'm looking for either.
I should explain why I'm searching for this type of roll. I had stomach surgery and I can't really eat bread (much as I love it) because the nice soft inside part fills me up too quickly and doesn't leave room for the food I must eat. However I can load up crusts and enjoy the bread taste without too much trouble.
So please King Arthur or anyone else out there if you have a recipe that will bake up into this kind of roll will you share it with me?
My love of homemade bread and my small tummy will thank you!
Lady Harvest Moon
badge posted by: webby1066 on August 11, 2010 at 8:23 am in General discussions
tags: Hollow rolls
share on: Twitter, Facebook
REPLIES TO THIS DISCUSSION
Save
Select your preferred way to display the comments and click "Save" to activate your changes.
reply by: pjh on August 11, 2010 at 9:50 am
pjh
I know EXACTLY what you're talking about: rosetti. Years ago we tried to replicate those rolls - and tried, and tried, and tried... supposedly they have a special cutter to produce them, and they use an incredibly hot oven. So, bottom line - can't help you with rosetti. But how about popovers or cream puff shells? Both taste nice and bready/crusty, and the interior can easily be pulled out. Or any light/crusty roll can simply have the interior pulled out... Try our Crusty Rolls recipe, which is the lightest, crustiest roll I know. Good luck – PJH
reply by: Mike Nolan on August 12, 2010 at 9:33 am
Mike Nolan
I had rosetti several times when we were in Italy, and they were fantastic.
I did find this thread which contains a recipe for rosetti.
http://en.allexperts.com/q/Italian-Cuisine-760/2010/7/Rosetti-rolls.htm
I haven't tried it yet, and until it cools down a bit (95 degrees again today) I may not be doing any 'experimental' baking.
A few followup notes on the recipe in the link I gave above: I'm assuming that instant dry yeast would be the equivalent of the the 'dried brewers yeast', and either AP or bread flour should work for the 'plain flour', though I'd lean towards the higher protein bread flour, but I'm not sure what is meant by 'plan flour', unless that's a typo and it is also supposed to be 'plain flour'.
I wish it wasn't supposed to be so beastly hot here (98 high expected today), otherwise I might give this one a try today.
reply by: Mike Nolan on August 12, 2010 at 8:33 pm
Mike Nolan
Another possibility would be to make popovers, there's not a lot of bread in each one.
BTW, I think I will try the rosetti recipe tonight/tomorrow, I'm already doing something else in the oven for supper tomorrow so I might as well get double duty from it. I'll report back on how well it works, as well as what I have to do to 'Americanize' the recipe.
reply by: pjh on August 12, 2010 at 10:42 pm
pjh
Nolan, I saw that recipe, too. It doesn't sound like it would make rosetti - sounds like it would make good hard rolls, yes, but there's no special shaping/baking/ingredients there that would make hollow rolls. That said - I've been surprised before! So let us know how they come out, OK? PJH
reply by: Mike Nolan on August 13, 2010 at 12:45 am
Mike Nolan
PJ, if all it does is make a good hard roll, I'll be happy with that, because I have yet to find a hard roll recipe I've been fully satisfied with, and I've tried a number of them.
Part of the problem is I know EXACTLY what I want in a hard roll, something akin to the ones I got in NYC once, soft as a pillow on the inside and a crust that was not only crisp but as thin as an eggshell and nearly that brittle. (We went through two or three orders of them at the table!)
I suspect there was something going on in the kitchen that I can't duplicate at home, maybe just a good dose of steam.
I think one of the reasons that we're so fond of epis here is that they come as close as anything I've found to date to duplicating that crust sensation.
I'll certainly report back on this one, like you I'm skeptical because I don't see anything obvious to cause them to hollow out, either. (But I've never figured out why pita puff up the way they do, either.)
The classic hard roll has been one of my two unresolved baking challenges, the other is Parker House rolls that don't unfold on me. :sigh:
--
Mike Nolan
reply by: Mike Nolan on August 13, 2010 at 4:01 pm
Mike Nolan
Well, they didn't hollow out, so neither of us were surprised, PJ. 🙂
The good news is that they're quite good hard rolls, possibly one of the better recipes I've tried. I'm not throwing the recipe away, I think it may come closer to my ideal hard roll than anything else I've tried. (But that may just be how they were baked, at a high temp and at the top of the oven.)
But as far as producing rosetti are concerned, either the ingredients aren't right or there's a technique missing. (Pâte à choux has egg in it, for example.)
The pictures of rosetti here: http://travel.webshots.com/photo/1426200356057837835aFNFCm
show a roll with an interesting pattern for the cuts. It looks like there's some kind of cutter being used, but I'm not sure how even a cutter would result in a large air pocket forming.
I'm tempted to try injecting an air bubble in the dough during final rise.
Getting back to the original poster's point about maximizing the amount of crust, have you considered making epi de bles?
reply by: Mike Nolan on August 14, 2010 at 11:32 am
Mike Nolan
This article over on Fresh Loaf looks promising:
http://www.thefreshloaf.com/node/13597/getting-hollow-rosetta-panini
Searches on 'rosetta' or 'pane rosetta' find additional information on them. I haven't found a rosetta press for sale yet, but using an apple corer (as shown in the article on Fresh Loaf) sounds like a reasonable suggestion.
I think the cuts are more than just decorative, once an air bubble is trapped I think multiple cuts will facilitate expansion to produce a somewhat hollow center. (I'd love to see a photo of what a true Italian pane rosetta looks like on the inside.)
Another suggestion that sounds worth trying is using the convection feature (and a high temperature setting) for the first few minutes.
reply by: frick on August 14, 2010 at 2:02 pm
frick
Now you have me really curious. We didn't have any in Italy and I realize we really missed something. I looked at the photo on your link and hope someone can figure it out. There are only two breads I know of that finish completely hollow in the center and they are pita and beignets, which are fried as you know. Maybe if you use a pita type recipe as a starting point? If made right, they puff completely into balls, even the small ones. A Kaiser roll stamp is the closest resembling cutter I can think of.
Did you notice in the photo that even the bottom has six sections? The cutter must go all the way through, yet the rosetti doesn't break into sections like pull-apart rolls. This is a real puzzle.
reply by: Mike Nolan on August 14, 2010 at 2:29 pm
Mike Nolan
Frick, I think the folding technique as shown on Fresh Loaf causes the bottom appearance, with the cutter responsible for the appearance of the top. (Pane rosetta means rose bread, named for the shape of the cuts on the top, presumably.)
This is definitely going to be on my list of recipes to tinker with this fall/winter. (If only to give me an excuse to avoid getting frustrated by Parker House rolls that won't stay folded.)
I suspect the process of folding in an air bubble is not difficult once mastered, I've been practicing the folding technique for Kaiser rolls and I'm getting fairly consistent at it.
reply by: frick on August 16, 2010 at 11:44 am
frick
Mike, et al, how much of an air pocket, or bubble, was inside ? Looking at the photos on the fresh loaf, I noticed he didn't get much of one, if any. I also looked at the price of ordering one of the cutters (totally silly unless we have a recipe and a method) and they are waaaay too expensive. It also didn't 'cut' the way a Kaiser Roll stamp does.
I want to make a roll with that shatteringly thin crust also, and I find epis end up mostly crust, which is thick and hard, a totally different crust quality than that of say, Italian rolls from our Italian market.
reply by: Mike Nolan on August 16, 2010 at 12:09 pm
Mike Nolan
I doubt I'd ever make enough of them to make it worthwhile to buy a pane rosetta stamp, but I don't have a Kaiser roll stamp, either. It only took me a few batches to get the hang of folding them by hand, though I'm far from perfect at it yet.
I'm not sure how much air can be trapped inside, that'll be a matter for experimentation. (And an excuse not to try making Parker House rolls!)
As I recall, the pane rosetta I had in Italy didn't have all that big an air pocket in them, maybe enough for a few tablespoons of filling. But I was in Turin and pane rosetta are said to be more common in Rome. (I would really love to see a picture of one cut open!)
I have my suspicion that there are several professional techniques behind making those eggshell-like crusts on hard rolls, including a high humidity proofing box and a steam injection oven. Moreover, I've only seen them done that way about twice, so it either must be really tricky to do or so much effort that most restaurants don't bother.
However, the crusts I got from my first batch of pane rosetta were a lot closer than anything else I've gotten to date, so my next attempt will probably involve starting them off at 500 degrees or more plus adding some steam. (If I win the lottery, I'm going to figure out how to remodel my kitchen to add a wall oven that does steam injection. My wife says I can't put it in the garage, though.)
PJ says that one of the tricks in producing hard rolls is to refrigerate the dough and pop it into the oven still cold. I may have to try that as well.
reply by: frick on August 16, 2010 at 3:47 pm
frick
Mike, who was our Italian friend who was posting for a while? If we could get a message to her, maybe she would have some suggestions on how to get some pane rosetta guidelines directly from the source.
reply by: frick on August 16, 2010 at 3:55 pm
frick
I found her name: Dora Lee Luch; she lives in Napoli. I'm going to ask KA if they would contact her for us, since asking for her email is inappropriate.
reply by: Mike Nolan on August 16, 2010 at 4:51 pm
Mike Nolan
I'd settle for a picture of one cut open. 🙂
BTW, if they brought Dora Lee's account over to the new BC, we could try 'friending' her (ugh, what a verb) that may get an email to her.
Of course, since there's no way to search the user directory other than 20 members at a time, finding her to send a friend request is a pain in the ***.
reply by: frick on August 17, 2010 at 3:35 pm
frick
WOW! Look what brianjwood sent us on the old BC.
Pane Rosetta
ricetta del pane tipico romano anche conosciuto come “michetta”
La rosetta romana è stata ideata dal Conte Guariniello che ha lasciato numerose ricette.
La preparazione della pasta lievitata e fermentata (biga), avviene mescolando e impastando farina di forza (100%), acqua (35%), lievito (1%), e malto (0,1%) sino a ottenere un impasto sostenuto e omogeneo. Si lascia riposare per almeno 16 ore (il tempo varia in base alla temperatura ambientale).
La preparazione delle forme di pasta arrotondate avviene impastando la biga con farina di forza (20% della dose iniziale) acqua (quanto basta per ottenere un impasto asciutto e morbido) e sale (0,5% del peso totale). Si aggiunge solitamente anche una piccola percentuale (0,5%) di preparato enzimatico, denominato “miglioratore”, che accelera la fermentazione e crea l’acidità minima ottenuta normalmente con altri impasti. La temperatura finale dell’impasto non deve superare i 23- 24°. L’impasto – che deve avere una buona elasticità e una texture perfetta, ottenute impastando almeno 30 min con la macchina al minimo – viene passato al cilindro (macchina che ha la funzione di raffinare ulteriormente la pasta) e poi suddiviso in pezzi di circa 3 kg di forma arrotondata. La pagnotta viene spalmata con olio extra vergine di oliva, che evita la formazione di croste. Si lascia lievitare per circa 30 min.
Il pastone viene diviso in pezzi esagonali di forma e peso uguali. Segue lo stampo a mano.
Le forme vengono informate, coperte con tela o fogli di plastica per conservarne l’umidità e lasciate lievitare per altri 30 min.
Le rosette vengono infornate tra i 220° ed i 250°, immettendo abbondante vapore acqueo nella camera di cottura. La cottura richiede circa 25 minuti. Nei primi minuti di cottura gli amidi si gelatinizzano aumentando la viscosità dell’impasto e viene rilasciata amilopectina dai granuli di amido presenti nella farina, che forma una trama reticolare insieme alle glutanine aumentandone l’elasticità . Il lievito, per effetto del calore, sviluppa anidride carbonica ed etanolo che gonfiano il prodotto creando un cavo all’interno del pane che dona alla rosetta la caratteristica soffiatura.
Ingredienti
farina “00″ tipo rinforzato; acqua; lievito; malto; sale; olio extravergine d’oliva
Buona serra
Sent by brianjwood! Wowwzers!
Time to hit Google Translate.
reply by: kitty828 on August 17, 2010 at 3:38 pm
kitty828
Mike, you got my curiosity going. No one in my family knows how to make this bread - we are calabrese. But I was cruising around the net and came across this post. I hope this helps a little. Good luck.
***"Then I found a recipe in Joe Ortiz book _The Village Baker_:
"Schiacciata and Michette Tuscan Flat Bread and Piedmontese Rolls",
page 247 (if you would like to have the recipe I can send it to you
in PDF). There is a drawing in the book showing the Bun Press they
use to make the pattern.
I also found a professional recipe in Italian at this web site:
http://www.ppservice.it/ricette/ricetta_rivola.htm***"
reply by: Naughtysquirrel on August 17, 2010 at 3:52 pm
Naughtysquirrel
Reply by frick on August 17, 2010 at 3: 35 pm WOW! Look what brianjwood sent us on the old BC.
TRANSLATION -I say WHAT?????...NS
Rosetta bread Bread recipe typical Roman also known as "The rosetta romana michetta" was conceived by count Guariniello which left numerous recipes. Pasta dough and fermented (Chariot), is done by mixing and kneading flour strength (100%), water (35%), yeast (1%), and malt (0.1%) until an homogeneous dough and supported. You leave to rest for at least 16 hours (time depends on the ambient temperature). Preparing the rounded shapes of pasta is made by mixing the chariot with flour strength (20% of the initial dose) water (just enough to get a dough dry and soft) and salt (0,5% of the total weight). You add usually even a small percentage (0.5%) of enzyme, called "Enhancer", which accelerates the fermentation and creates the minimum acidity obtained normally with other powders. The final of the dough temperature must not exceed 23-24th. The dough – that must have a good elasticity and a perfect texture, obtained by mixing at least 30 min by car to a minimum – is passed to the cylinder (machine designed to further refine your pasta) and then divided into pieces of about 3 kg of rounded shape. The loaf is coated with extra virgin olive oil, which avoids the formation of scabs. You let rise for about 30 min. The pastone hexagonal is divided into pieces of equal weight and shape. Follows the mold by hand. Shapes are informed, covered with canvas or of plastic to retain moisture and leave to rise for another 30 min. Geraardsbergse rosettes between 220 ° and 250 °, entering abundant water vapor in the cooking Chamber. Cooking takes approximately 25 minutes. In the first few minutes of cooking it solutions will gelate starches by increasing the viscosity of the dough and is released amylopectin from granules amid% 20 ...
reply by: Naughtysquirrel on August 17, 2010 at 4:14 pm
Naughtysquirrel
TRANSLATION - WHAT?????...NS
I love to bake..but this is wayyy over my head
reply by: frick on August 17, 2010 at 4:31 pm
frick
naughtysquirrel, you are astounding. Looks like it still will take some work . . . I'm not surprised that some of it doesn't make sense (like 3 kg pieces of dough for the rolls). That's between 5-6 pounds, so looks like we have a project at hand. I found this handy formula on a site called Joy of Baking:
ounces multiplied by 28.35 = grams
pounds multiplied by 0.454 = kilograms
I have no more time today. I love this kind of challenge. Can we do it in a crazy cheapo tabletop convection oven?
I wonder if anyone has a good description for the "Enhancer". I bet KidPizza does. It could just be citric acid.
reply by: Mike Nolan on August 17, 2010 at 5:07 pm
Mike Nolan
I got a similar translation. My reading of it is that the process is similar to making pita, with it inflating as it bakes.
That would appear to be a different type of roll than the one that started this quest, which appears to be the one in the picture I gave a link to. The folding technique described in the post over on Fresh Loaf also sounds like it would make that other type of roll.
Not that this recipe and process doesn't sound interesting in its own right. That's what makes making bread fun, there are always thousands of recipes and techniques left to learn.
reply by: Mike Nolan on August 17, 2010 at 5:25 pm
Mike Nolan
Here's a slightly different translation. These go in a really hot oven 250 degrees C = 482 degrees F.
It sounds like these are designed to inflate similar to the way pita does, which is quite different from the folding process described on FreshLoaf.
Anyway, here's the translation.
bread recipe is also known as typical Roman michettas
The rosette Roman was designed by Count Guariniello that left many recipes.
The preparation of the dough and fermented (chariot), is stirring and mixing flour strength (100%), water (35%), yeast (1%) and Malta (0.1%) until dough is supported and homogeneous. Left to rest for at least 16 hours (time varies depending on ambient temperature).
The preparation of the rounded shapes of pasta is mixing the chariot with strong flour (20% of the initial dose) water (enough to obtain a dough dry and soft) and salt (0.5% of total weight). It usually adds a small percentage (0.5%) of enzyme preparation, called "better", which speeds up the fermentation and creates the minimum acidity normally obtained with other mixtures. The final dough temperature should not exceed 23 to 24 degrees. The mixture - which should have good elasticity and a perfect texture, obtained by mixing at least 30 minutes by car to a minimum - is passed to the cylinder (the machine that serves to further refine the paste) and then divided into pieces of about 3 kg rounded. The loaf is coated with extra virgin olive oil, which prevents the formation of scabs. It is left to rise for about 30 min.
The dough is divided into pieces of hexagonal shape and weight. Following the mold by hand.
The forms are informed, covered with canvas or plastic sheets to retain moisture and let rise for another 30 min.
The rosettes are fired between 220 ° and 250 °, abundant water vapor entering the baking chamber. Cooking takes about 25 minutes. In the first few minutes of cooking the starch will gelatinize increasing the viscosity of the dough and is released from amylopectin starch granules in the flour, forming a lattice pattern along with glutanine improving its elasticity. The yeast, the effects of heat, carbon dioxide and ethanol that develops inflate the product by creating a cable inside the bread that gives the characteristic rosette blowing.
Ingredients
flour "00" ruggedized, water, yeast, malt, salt, extra virgin olive oil
reply by: Mike Nolan on August 17, 2010 at 5:27 pm
Mike Nolan
OK, this is getting rather frustrating.
It appears if you use the 'post reply' button at the bottom of a thread, it goes at the top of the thread. Anyway, I've replied twice using that button, both of them went to the top, so now I'm doing a reply using the one right after the initial post, I wonder where it will show up?
reply by: Mike Nolan on August 17, 2010 at 5:29 pm
Mike Nolan
The Italian recipe calls for a 220-250 degree oven (Celsius), that's pretty much the equivalent of 425-475 F.
I'm getting frustrated with where replies are showing up right now (I made two of them that popped up to the top), must be time to do something else for a while. :sigh:
reply by: pjh on August 17, 2010 at 5:43 pm
pjh
The crust you describe is blistering heat and absolutely the blast of steam - never been able to duplicate it in a home oven...
reply by: annee on August 17, 2010 at 5:46 pm
annee
I get hard rolls from the local german deli and they do have an inside but also they have a nice hard crust I have always heated them and the insides always comes out in one piece and I save these for other endeavors (meatballs etc.) but Broechen is what they call them at the deli. I have a recipe I had made one time and they were close to what I buy I will try and find it and post it.
reply by: Mike Nolan on August 17, 2010 at 5:49 pm
Mike Nolan
Yeah, I was afraid that was the case, PJ.
I can get temperatures over 650 degrees in my gas grill outdoors, we've done pita on it a couple of times, but I don't think I can add the blast of steam.
The best I can get indoors is about 550.
reply by: Mike Nolan on August 17, 2010 at 6:16 pm
Mike Nolan
I just sent a note to someone I know who goes to Italy every summer and is something of a gourmand, to see what he knows about pane rosetta.
reply by: Mike Nolan on August 17, 2010 at 7:13 pm
Mike Nolan
Here's my friend's response:
Pane rosetta is one of the most common of the Italian breads. They
are not really hollow, but light and airy on the inside with a nice hardish crust. They are often used as the bread with dinner, and I like them for sandwiches -- because of their relative lightness inside, they can be nicely squished. The texture of the bread inside is filled with air pockets and a bit chewy.
Exquisite.
I didn't realize that in addition to all of your other accomplishments you were a serious baker. I'm a serious pasta chef, but baking is, alas, beyond my current capabilities. I will try to find a recipe for you.
I believe that you are correct about capturing an air bubble. It is not a flat bread.
reply by: Mike Nolan on August 17, 2010 at 10:53 pm
Mike Nolan
He's also going to contact a good friend of his in Rome about pane rosetta, I suggested some pictures of ones that have been cut in half would be very helpful.
reply by: frick on August 18, 2010 at 9:09 pm
frick
kitty 828, I downloaded the recipe you found (in Italian, then in translation from google):
So many recipes, so little time. :-))
ROSETTE SOFFIATE
Ricetta curata dal MAERSTRO FAUSTO RIVOLA
FORMULA BIGA
Ordine utilzzo Ingredienti um. Quantità
1 Farina w360 kg 5,000
1 Acqua kg 2,250
1 Lievito birra kg 0,050
Totale biga kg 7,300
TABELLA IMPASTO SERALE
TEMPERATURE Impasto 20°
Di lievitazione 18/20°
TEMPI DI LAVORAZIONE Impasto 10/12'
Lievitazione 20 ore
PROCEDIMENTO SERALE
Impastare tutti gli ingredienti come da tabella.
Porre in una bacinella capiente e porre a lievitare.
FORMULA IMPASTO
Ordine utilzzo Ingredienti um. Quantità
1 Biga kg 7,300
1 Farina w360 kg 1,000
1 Coadiuvante naturale kg 0,060
1 Malto kg 0,030
1 Lievito birra kg 0,040
1 Acqua kg 0,870
1 Sale kg 0,090
Totale impasto kg 9,390
TABELLA IMPASTO
TEMPERATURE Impasto 25°C
Cella 30°C
Forno 240°
TEMPI DI LAVORAZIONE Impasto 5' + 6'
Riposo impasto 10'
Riposo preforme 30'
Lievitazione 60/70'
Cottura 22/25'
PROCEDIMENTO IMPASTO
Mettere nell'impastatrice tutti gli ingredienti ad eccezione del sale che va aggiunto a qualche minuto dalla fine dell'impasto.
Far puntare poi l'impasto come da tabella, spezzare del peso desiderato, formare a boccia poi porre su tavola e ungere la superficie con oli di oliva.
Spezzare poi stampare e capovolgere le rosette con lo stampo sotto.
Lievitare poi riportare lo stampo sopra ed infornare con abbondante vapore.
A cinque minuti dalla fine della cottura aprire i tiraggi del vapore.
WASHERS BLOWN
Recipe prepared by MAERSTRO FAUSTO RIVOLI
FORMULA BIGA
Please use Order Ingredients um. Quantity
1 kg flour W360 5.000
1 Water 2.250 kg
Beer yeast 1 kg 0.050
Total chariot 7.300 kg
EVENING MIXING TABLE
Dough TEMPERATURE 20 °
Proving 18/20 °
TIMES Dough 10/12 '
Rising 20 hours
EVENING PROCEEDINGS
Mix all the ingredients to the table.
Into a large bowl and set aside to rise.
MIXING FORMULA
Please use Order Ingredients um. Quantity
1 Biga 7.300 kg
1 kg flour W360 1.000
A natural adjuvant 0.060 kg
1 Malt 0.030 kg
Beer yeast 1 kg 0.040
1 kg Water 0.870
Salt 1 kg 0.090
Total 9.390 kg dough
MIXING TABLE
Dough TEMPERATURE 25 ° C
Cell 30 ° C
Oven 240 °
TIMES Dough 5 '+ 6'
Rest dough 10 '
Rest preforms 30 '
Proving 60/70 '
Cooking 22/25 '
MIXING PROCEDURE
Place all dough ingredients except salt which is added a few minutes from the end of the dough.
Then the mixture can point to the table, breaking the desired weight, then form a ball put on the table and grease the surface with olive oil.
Break then print and flip the washers under the mold.
Then rise back above the mold and bake with plenty of steam.
Five minutes after the opening draw of steam cooking.
reply by: Mike Nolan on August 19, 2010 at 6:45 pm
Mike Nolan
Most of the recipe makes sense (at least I think it does), but I'm not sure what 'a natural adjuvant' is, some kind of dough conditioner?
BTW, my friend says that his friend in Rome is on vacation until around the second week of September, so I don't expect to get any pictures until then, but he has promised to send some.
I think I may make another batch of these over the weekend using the earlier recipe, they were tasty even if they didn't have the air pockets in them. I can try that folding technique described over on Fresh Loaf, too.
We were wondering what we could put inside the dough when shaping it to help create an air pocket. I rejected the suggestion of a chip of ice, too likely to make the dough soggy, but the idea of putting a little piece of chilled butter inside sounds worth trying.
reply by: Mike Nolan on August 19, 2010 at 7:29 pm
Mike Nolan
Here's a nearly unintelligible patent extract for a 'fermentation adjuvant for yeast leavened bread processes':
http://www.freepatentsonline.com/3900570.html
reply by: frick on August 19, 2010 at 8:51 pm
frick
I found two recipes for dough enhancers in Bookbag's recipes and they might give you some ideas.
Just to make sure these recipes are protected and saved, I'm posting those I downloaded from Bookbag's recipes about a year ago. I use #2 regularly with great consistent results. kimbob
Dough Enhancer #1
4 c nonfat instant dry milk
3 T vitamin C powder (ascorbic acid or Fruit Fresh)
3/4 c lecithin granules (from health food section or store)
2 T ginger, ground
2 T cornstarch
1. Mix; store in airtight container
2. Use as much as yeast is called for in recipes, e.g., 2 t yeast, add 2 t enhancer
Dough Enhancer #2
1/2 c lecithin granules
1 1/2 t ginger, ground
1 1/2 t vitamin C powder (ascorbic acid or Fruit Fresh)
2 T distatic malt (from KAF or beer/wine making supply co.)
1. Mix; store in airtight container
2. Use 1/2 t per cup of flour used in recipes
3. If making whole wheat/whole grain breads, add 1 T vital gluten/per cup of flour
4. If desired, add 1/2 c dairy acid whey from buttermilk or cheese making or fresh buttermilk in place of liquid in recipe
reply by: frick on August 19, 2010 at 9:07 pm
frick
Noting that any recipes I embed in a thread, I will also submit for the recipe archive so that they will be searchable.
reply by: Mike Nolan on August 19, 2010 at 10:42 pm
Mike Nolan
That's a good idea, frick, though the search function for this site appears to work a lot better than the old one did. But so far the recipe section appears to be a big step down from the old BC.
reply by: frick on August 25, 2010 at 9:18 pm
frick
KidPizza has sent me a recipe with a biga, pretty straightforward, but I doubt if it will appear here because it's four pages long. Well, maybe, someday.
It is purported to attain up to golf ball size cavities.
I also found one in Carol Field's "The Italian Baker". More on this later.
reply by: frick on August 25, 2010 at 9:21 pm
frick
KidPizza, Thank you, thank you, thank you. Now, just to wait for cooler weather.
reply by: PaddyL on August 25, 2010 at 11:16 pm
PaddyL
What's the name of the bread in the Carol Field book, frick? I have that book and would like to look it up. Oh silly me, just scrolled up and found it - Rosetta.
reply by: Mike Nolan on August 26, 2010 at 12:33 am
Mike Nolan
Frick, if you can mail or fax me a copy of the recipe Kidpizza sent you (or if Kidpizza can do the same), I'll happily type it up.
reply by: KIDPIZZA on August 26, 2010 at 10:41 am
KIDPIZZA
MIKE NOLAN:
Good morning. I cannot type this...I can only zerox it & mail it out.
dunask@msn.com
~CASS.
reply by: PaddyL on August 26, 2010 at 4:19 pm
PaddyL
Rosetta rolls aren't hollow inside.
reply by: chiara on August 26, 2010 at 11:53 pm
chiara
I remember those rolls (panini) as they were a typical roll found in breakfast bread baskets at hotels in the 1980s and at bread shops. I don't recall seeing them in recent trips to Italy. I remember them being called "Mantovani" meaning from Mantua (Mantova) but I was unable to confirm that doing a google search. Carol Field's "Italian Baker" produces her recipe for "Rosette Veneziane" with a sketch of what I remember as Mantovani and what everyone else is referring to. (Mantua and Venice are both northern cities so perhaps this in a northern Italian roll.) Field does not say anything about the rosette being hollow inside so perhaps her recipe does not result in a hollow roll.
reply by: chiara on August 27, 2010 at 10:05 pm
chiara
I realized after I posted my last message that the recipe across from "Rosette Veneziane" in Carol Field's "Italian Baker" is for "Semelle: Little Rolls from Florence". Field explains that the dough is used to make the flower-shaped "rosetta" (Florence) and "michetta" (in Milan) but the empty inside is due to a combination of a special cutter AND high oven temperature. When made by hand, the rolls are not hollow inside though still good, according to Field.
reply by: Mike Nolan on August 28, 2010 at 10:56 am
Mike Nolan
PJ suggested that a special cutter might be needed, too, and I think she also said something about high temperature being a factor.
I'm not sure how that would lead to a hollow inside, though I could see that producing a very open crumb, like a baguette. It's mysteries like this that make breadmaking a challenge.
reply by: frick on August 28, 2010 at 6:00 pm
frick
Mike, we'll scan the xerox copy and try an email. I'm down with shingles at present so will get DH to do it. Word to the wise, EVERYONE who has had chicken pox should immediately get the shingles vaccine. If you haven't had CPox, get the CPox vaccine. No amount of money is worth the agony this is causing.
10 full on days of outbreak and agonizing pain and no let up in sight. I slept ZERO hours last night.
Mike, if it doesn't come through clear, DH will copy and mail it.
This recipe SAYS it will achieve up to a golf ball size hollow but they do use the stamp which we will have a hard time getting, and boy is it pricey. Somehow, we will have to devise one. 🙂
The one in The Italian Baker is more like a Kaiser roll and is hand formed.
reply by: frick on August 28, 2010 at 6:21 pm
frick
Here's the link to the shaper/cutter for the pane rosetti:
Stampo professionale per pane Rosetta. Diametro mm 105
http://www.rbshop.it/stampi-per-pane,43.html
It's unusual looking, will be a bear to try to copy, but it costs 35.92 euros! Plus shipping, of course. If anyone wants this thing, (and I confess, I do), any hints on other sources will be appreciated. The best idea I have is if anyone is connected with a baking school which might order some for us . . . but I bet there would have to be a minimun order of a dozen or so, and it will be hard to find many of us who want to make the investment.
Do any of you know anyone going to Italy within the next few months?
reply by: frick on August 28, 2010 at 6:28 pm
frick
Here's another possibility from the San Francisco Baking Institute, though you will see a difference.
Large Star with Center Hole - $11.50
http://www.sfbi.com/baking_supplies.html
reply by: Mike Nolan on August 28, 2010 at 7:46 pm
Mike Nolan
One of the articles I found on pane rosetta said that the number of cuts can vary from 5 to 10, and the article over on FreshLoaf suggests using an apple corer/slicer. I plan to try that next time. The trick may be to keep it from going too far in.
Somehow I don't think the cuts have much to do with getting a hollow roll.
reply by: sirryan101 on August 30, 2010 at 3:03 am
sirryan101
@Annee
Would love to see that recipe. Unfortunately, Brötchen is German for bread rolls and does not specify one type of recipe for it. That being said, I found a yahoo answer/question that contains three recipes. Do any of these seem familiar?
http://answers.yahoo.com/question/index?qid=20071129032158AAS5tJP
My favorite bread in Germany was a laugenstangen. It is a Bavarian pretzel baguette. This bread was so much tastier than an American pretzel and, despite being topped with large salt, it was not as salty as the American version.
I hope this help,
Ryan
reply by: FlyingRoo on August 30, 2010 at 3:22 pm
FlyingRoo
And here is the stamp they use for these
http://www.rbshop.it/174,stampo-professionale-per-pane-rosetta.-diametro...
http://www.officinebano.com/product.aspx?cat=5_36_184
P.S. I think they still have a lot to work on this site, the posts are shown in seemingly no order
Here you go. Let me know if you need a proper translation.http://www.nistriandrea.it/nistriandrea_on-line/tecniche/file/33_ROSETTA...
Also, you might want to have a look here, it has pictures for every step, make sure you go all the way to the bottom of the page for all info
http://www.thefreshloaf.com/node/13597/getting-hollow-rosetta-panini
reply by: FlyingRoo on August 30, 2010 at 3:35 pm
FlyingRoo
The adjuvants are usually enzymes and emulsifiers.reply by: celesteu on September 03, 2010 at 10:23 am
celesteu
Dan Leader's "Local Breads" includes a recipe for rosetta soffitati / michetta rolls (page 226-229), you might be able to see it on Google Books). It's a clear, detailed recipe, calls for a biga fermented 9-17 hrs, then a dough made w/the biga, bread flour, water, diastatic malt, and sea salt. He says that the hole isn't possible without a rosetta roll stamp, and that the rolls must be inverted after stamping to preserve the impression & chilled for 3-8 hours. Various internet sources have every roll-stamp shape imaginable, so I'm sure you can find one that's appropriate. Good luck!reply by: frick on September 03, 2010 at 12:56 pm
frick
celesteu, I have that recipe from Local Breads which KidPizza was kind enough to send me. I'm down with shingles right now and won't be baking anything challenging for another month or so. I'm still searching for an affordable stamp.reply by: celesteu on September 03, 2010 at 2:02 pm
celesteu
Maybe the KA folks will see this and introduce a rosetta cutter into their product line. The large star with a center hole sold on the San Francisco Baking Institute's site ($11.50) looks like it might work, but the true rosetta stamp doesn't have thin edges comprising the star shape--it's made with broader, rounded raised spokes. It seems you can purchase the item easily in the EU, but no N.American places seem to sell it.reply by: Mike Nolan on February 08, 2011 at 7:45 pm
Mike Nolan
I finally got the pictures of the pane rosetta rolls from my friend courtesy of his friend in Rome.I have posted them at:
http://romaine.tssi.com/bread/pane-rosetta1.jpg
http://romaine.tssi.com/bread/pane-rosetta2.jpg
http://romaine.tssi.com/bread/pane-rosetta3.jpgAs these pictures show, there is a sizable cavity in these rolls.
They look tasty, I may have to try that recipe again soon, seeing if I can create an air pocket. I'm almost tempted to try an air pump with a basketball inflating needle, say about half way through the final rise. 🙂
reply by: panbon on November 25, 2013 at 8:55 am
panbon
I see this thread is pretty old, but some folks might want to know that I have finally been able to get the hollow rosetta rolls that this topic is all about. The trick is to roll the dough out thinly several times and then roll it up like a cinnamon roll, but very tightly. You have to do this with each roll. Also, I have found that I get better results if I make a Tartaruga roll rather than a Rosetta. I stamp these with a French Fry cutter. Here's the recipe with step-by-step instructions with pictures. Except for the trick above, it's the classic Italian recipe. KA AP flour should work well using this recipe.https://www.facebook.com/photo.php?fbid=708406785837690&set=a.7084058025...
reply by: omaria on November 25, 2013 at 11:17 am
omaria
Wow panbon. What a great job you did explaining how to make these rolls. I am sure Mike Nolan and Frick and PJH will love to see this. Your pictures are great too. I do not have a steam oven, but with a tray of water and spraying I might come close. Certainly worth a try. Thank you so much.reply by: frick on November 25, 2013 at 11:46 am
frick
Thank you. Thank you. Thank you.
.
Same here -- no steam oven (or pizza oven either) but it gives me hope and incentive to order the stamp. I can tell you spent a lot of time developing your process before having achieved an almost unattainable product. And you did it with Gold Medal! Bravo!reply by: Mike Nolan on November 25, 2013 at 11:49 am
Mike Nolan
Thanks for the tip! I have a friend who spends summers in Italy, he tells me that the bake shops there are VERY protective of their techniques for getting that hollow cavity.reply by: PaddyL on November 25, 2013 at 12:57 pm
PaddyL
Someone on thefreshloaf.com has worked this recipe out. You could try checking there for his recipe.reply by: omaria on November 25, 2013 at 2:27 pm
omaria
Paddy, it is the same guy who posted here. Same pictures and everything.reply by: adele133 on December 10, 2013 at 12:57 pm
adele133
Lokking for a different Italian bread recipe, one that I used to be able to buy in the Hudson Valley -- bakery no longer in business-- i found this thread about rosettes. I was just in Rome and kept looking for an alimentari until I found one that sold them. and yes, they are almost hollow in side. I described them to someone here at home as kind of like monkey bread with the pieces fused together, but i think you all are correct that there must be a stamp of some kind. These are typically Roman rolls, so you likely won't find them in Calabria or Abruzzo etc. wish i had one right now.... and i wish Luna Baking Company was still producing sliced round italian sandwich bread!reply by: frick on December 10, 2013 at 3:29 pm
frick
They are definitely made with a stamp. You can find youtube videos that show just how they are shaped. I contacted Bread Alone last week, which at one time sold them. Regretably, no longer. I should have ordered one back when we began this thread. If you find a source for the stamp, please let us know.
.
Here are a couple of links:
.
.
.
.
Keep looking and you'll find more. We just need a place to buy the stamp.reply by: rottiedogs on December 11, 2013 at 8:18 am
rottiedogs
I found these sites to purchase the stamp. Way back I did order it from rbshop.it but they do not seem to have a web site anymore. The attempts at these rolls have been less than stellar but I keep hoping.http://www.sfbi.com/baking-supplies/roll-stamp
http://www.fantes.com/bread.html#kaiserreply by: frick on December 11, 2013 at 5:29 pm
frick
rottiedogs, thanks very much. I had shopped around on the SFBI but at that time their kaiser stamp didn't have the round hole in the middle. I can't wait to try these. I see a stainless one at fantes. At 3 1/4", they seem smaller than I would have thought. What do you think? Which one do you have?
.
I am determined to make these rolls.reply by: rottiedogs on December 11, 2013 at 5:07 pm
rottiedogs
I have a metal one. I will measure it when I get home. I'm not sure exactly what the size is. It makes a decent size roll. Now if they would just poof like they are shown in the pictures it would be perfect!reply by: frick on December 11, 2013 at 5:45 pm
frick
What recipe are you using? I can translate the one from that Italian video. It seems to be made with a levain. I have two sourdough starters. I also would have no qualms about using all yeast or part levain augmented with starter. But will probably start with Daniel Leader's recipe in Local Breads. He says he has achieved holes as large as golf balls.
.
Do yours to pouf at all? Or do they pouf but without the cavity in the center? What flour are you using?.
Mike, are you reading this. What flour did you use? Best I remember you said you never got them to form the hollow pocket, or at least not reliably.
.
It looks like I will order the metal stamp from SFBI.Topic: Sweet Petals (Yeast)
Sweet Petals (Yeast)
This is a great old favorite from the late '70's that is shaped into a "petal" like a flower on a round pizza-type pan.
1 pkg. yeast
1/4 cup warm water
3 Tbsp. butter
2 Tbsp. sugar
1 1/2 tsp. salt
3/4 cup hot scalded milk
3 cups flourSoften yeast in warm water. Combine butter, sugar, salt, & scalded milk in large bowl. Cool. Add yeast mixture & add flour. Knead 3-5 min. Place in greased bowl, cover, let rise in warm place (85 degrees) for 1 hour.
Place small pieces of dough in hands & roll into thin "snakes"..., then dip into butter, then cinnamon, sugar, nuts mixture (see below), & begin a "petal" in center of a round pan. Keep adding the coated "snakes" to form a giant flower petal, & sprinkle w/leftover sugar mixture/butter.
Let rise 1 hour.Bake at 350 degrees for 25-30 min.
Topping
1/2 cup melted butter to roll "snakes" in
3/4 cup sugar
1/4 cup brown sugar
2 tsp. cinnamon
3/4 cup chopped pecansStrawberry Rhubarb Surprise Pie
1 cup flour
1 tsp. baking powder
1/2 tsp salt
2 Tbsp. butter
1 egg, beaten
2 Tbsp. milkWhisk together the flour, bkg. powder and salt. Cut in butter. Add egg and milk. Mix. Press into 9" pie plate.
3 cups diced rhubarb
1 (3 oz) pkg strawberry Jello (dry)
1/2 cup flour
1 cup sugar
1/2 tsp. cinnamon
1/4 cup melted butterArrange rhubarb in shell. Sprinkle with dry Jello. Combine remaining ingredients and sprinkle onto pie.
Bake at 350 degrees for about 50 min. or until tender.
Topic: Steamed Persimmon Pudding
Steamed Persimmon Pudding
1 cup white sugar
1 cup sour milk
1 cup persimmon pulp
1 egg
1/2 cup or more chopped pecans, etc. (I use 1 cup)
1 cup raisins
1 tsp. soda
2 3/4 cups flour
1 tsp. cinnamon
1/4 tsp. ground cloves
1/3 cup melted shortening (or oil)
1 tsp. vanilla
1/2 tsp. nutmeg
1 tsp. salt
1 tsp. baking powderThis should all be stirred together well in order listed (or sift dry ingredients together and add a bit at a time to the liquid ingredients)
Steam for 2 1/2 hours in greased/floured pudding molds or coffee cans and covered with heavy foil if using coffee cans or a mold w/out a lid.
After 2 1/2 hours, turn off heat, remove kettle lid & with HOT PADS remove coffee cans or pudding mold to cool for 30 min. to 1 hr. before slicing.
It is SO moist and rich...it won't last long!!! It smells so wonderful as it steams on the stove on a chilly fall/winter day.
This can be steamed in a tall kettle with coffee cans or a mold well greased and floured before batter goes in. Put 1 in. of water into bottom of pan/kettle...add a rack in bottom to hold coffee cans/mold off of pan bottom, set the coffee cans/mold, covered with foil or mold lid, onto the rack, and cover pan/kettle w/tight-fitting lid.
Turn heat on high until water starts to boil, you will see bubbles forming around where lid sets on kettle...turn down heat to low or just above simmer and the steam will cook the pudding to a moist done-ness after 2 1/2 hrs. of steaming.
I've never had to add more water to the bottom of kettle, but there should always be water drops spitting around the seam where lids sets on kettle, so adjust the burner heat so this occurs and don't lift lid to let steam escape...if needed, add hot water from tea kettle to kettle bottom and close quickly so pudding can resume steaming process.
Topic: Chocolate Eclipse
This recipe comes from Mollie Katzen's Still Life with Menues. She said "This dessert is fashioned after one of my mother's specialties that she would make about once a year (usually when a grade as hook teacher came over for lunch). It is a soft, moist chocolate cake with a built-in puddinglike sauce that ends up underneath."
Ingredients
2 tablespoons butter
2 ounces (2 squares) unsweetened chocolate
2 cups buttermilk at room temperature
1 teaspoon vanilla extract
2 ½ cups (10 5/8 ounces) unbleached white flour
2 ¼ cups packed brown sugar (15 3/4 ounces)
3 teaspoons baking powder
1 teaspoon baking soda
½ teaspoon salt
1 cup semisweet chocolate chips (optional)
½ cup + 2 tablespoons (1 7/8 ounces) unsweetened cocoa powder
2 ½ cups boiling waterDirections
Preheat oven to 350F. Grease a 9x13-inch baking pan. A glass Pyrex ne is nice if you have it.
Melt butter and chocolate together.
Combine buttermilk with chocolate mixture and vanilla.
In a large mixing bowl combine flour, 1 cup (7 ounces) brown sugar, baking powder, baking soda and salt. Mix well (use your hands if necessary) to break up any lumps of brown sugar, making it as uniform as possible. Add chocolate chips, if desired.
Pour in the wet ingredients and stir until well combined. Spread in the greased pan.
Combine the remaining 1 ¼ cups (8.75 ounces) brown sugar with the cocoa powder in a small bowl. (Fingers work well here). Sprinkle this mixture as evenly as possible over the batter.
Pour on the boiling water. It will look terrible and you won't believe you are actually doing this, but try to persevere.
Place immediately in the preheated oven. Bake for 30-40 minutes, or until the center is firm to the touch.
Cool at least 15 minutes before serving. Invert each serving on a plate so the sauce on the bottom is on top. Serve hot or at room temperature.Mollie's Note: Chocolate Eclipse tastes best about an hour or two after emerging from the oven. For an ultimate experience,serve it with vanilla ice cream.
Topic: Rhubarb Nut Bread
Rhubarb Nut Bread
1 1/2 cups brown sugar
2/3 cup oil
1 egg
1 cup sour milk (I have used buttermilk instead)
1 tsp. salt
1 tsp. soda
1 tsp. vanilla
2 1/2 cups flour
1 1/2 cups fresh, finely diced rhubarb
1/2 cup finely chopped nuts (I use 1 cup)Topping:
1/2 cup sugar
1 Tbsp. melted butterMix sugar/butter & sprinkle onto batter.
Bake at 350F degrees for 50 min. in a loaf pan.
Topic: Raspberry Shortcake Pie
Raspberry Shortcake Pie
1 cup frozen non-dairy whipped topping, thawed
1 jar (7 oz.) marshmallow creme
1 cup raspberry sherbet, softened
1 container (6 oz.) raspberry low-fat yogurt
1 cup fresh or frozen red raspberries
1 Keebler Ready Crust Shortbread Pie CrustIn medium bowl, whisk together whipped topping & marshmallow creme until combined. Gently stir in sherbet and yogurt.
Place raspberries in crust. Spoon whipped topping mixture over raspberries. Freeze at least 4 hours or until firm. Let stand at room temperature for 15 minutes before cutting. Garnish as desired & store in freezer.
Topic: Pumpkin Pie Crunch
Pumpkin Pie Crunch
1 can(16 oz.) solid pack pumpkin
1 can (12 oz.) evaporated milk
3 eggs
1 1/2 cups sugar
4 tsp. pumpkin pie spice
1/2 tsp salt
1 pkg. DHines Moist Deluxe Yellow Cake Mix
1 cup chopped pecans
1 cup butter, meltedWhipped Topping
Preheat oven to 350 degrees.
Grease bottom of 13 x 9 x 2 in. pan.
Combine pumpkin, evaporated milk, eggs, sugar, pumpkin pie spice, & salt in large bowl. Pour into pan.
Sprinkle dry cake mix evenly over pumpkin mixture. Top w/pecans. Drizzle w/melted butter. Bake at 350 degrees 50-55 min. or until golden. Cool completely. Serve w/whipped topping. Refrigerate leftovers.
16-20 servings
For a richer flavor, use DHines Moist Deluxe Butter Recipe Golden Cake Mix.
Recipe from DHines Baking with Love book.
Topic: Pumpkin Cookies
Pumpkin Cookies
1/2 cup Crisco
1 cup white sugar
1/2 cup brown sugar
1 egg
1 cup pumpkin
1 tsp. vanillaCream above ingredients. Slowly add:
1/2 tsp. salt
1 tsp. baking powder
1 tsp. baking soda
2 Tbsp. cinnamon (yes)
1 cup raisins (I love currants, as well as raisins)
2 1/2 cups flourMix all together well. Bake at 350F until softly done (approx. 10 min) on a no-stick cookie sheet (parchment). Don't overbake! When completely cooled, ice with sour cream frosting. We also love cream cheese icing with these. MMMM!!!
Topic: Potato Puffs
Potato Puffs (Great use for leftover mashed potatoes)
1/4 cup milk
1 cup mashed potatoes
1 egg
salt
pepper
1/2 cup grated cheeseBeat milk into mashed potatoes until smooth. Add egg, salt, pepper; stir in grated cheese. Pour into buttered muffin pan. Bake at 350 degrees for about 15 min. Serve hot.
Topic: Pear Squares
Pear Squares
2 cups flour
2 cups packed brown sugar
1 stick butter, softened
1 cup chopped blanched almonds
1 tsp. cinnamon
1 tsp. baking soda
1/2 tsp. salt
1 cup plain yogurt
1 tsp. vanilla
1 egg
1 can (16 oz.) pears, drained and cut into small chunksPreheat oven to 350 degrees.
In large bowl, combine flour, brown sugar, and butter; using hands, mix until crumbly. Stir in the nuts.
Press 2 3/4 cups of the crumb mixture into bottom of an ungreased 9 x 13 inch baking dish. Add cinnamon, baking soda, salt, yogurt, vanilla and egg to the remaining crumbly mixture; mix well. Stir in pears, then spoon evenly over the crumb bottom. Bake 40 min. Let cool 1 hr. Cut into squares and serve.