Chocolate is something I’ve dabbled with over the years, covering home made candy (especially sponge candy) with milk chocolate, for example, but I really didn’t know anything about working with chocolate, much less making items that would look professionally made.
Well, to correct that, I recently attended the course called ‘Chocolate 1.0 — Discovering Chocolate’ at the Chocolate Academy in Chicago. That’s the official name of the course, but the staff calls it Chocolate Boot Camp, and it was an intense four days for me, especially since I’m a desk jockey and not used to standing and working in a kitchen 8–9 hours at a time.
This course was a Christmas present from my older son. (My younger son gave me a similar present two years ago, the ‘Foundation of Pastry Line’ course at the San Francisco Baking Institute, near where he works at YouTube. In fact, it was Chef Michel Suas, founder of SFBI, who suggested I take the Chocolate Academy course rather than the one SFBI offers once a year.) I was originally hoping to take the course this summer, but that session filled up before I could get all the details worked out. But the first week of October was a good week to be in Chicago, the Cubs were about to enter the playoffs and the weather was decent, except for one day of rain. (It wouldn’t be Chicago without a little rain, though.)
The Chocolate Academy is run by Barry Callebaut, formed by the merger of Callebaut, a Belgian company, and Cacao Barry, a French company, in 1996. They also own a number of smaller chocolate firms, including Van Leer and Mona Lisa. Barry Callebaut says that 25% of the chocolate available worldwide includes some of their products.

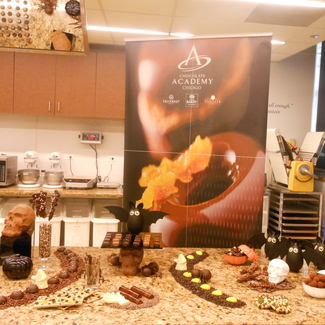
Above is a small selection of the work the students and staff assembled over four days. (As you can probably tell, it was a Halloween-themed display.)
Day 1:
The first morning was spent in the classroom, learning about how chocolate is made, starting with growing and harvesting the cacao pods, and getting an introduction into the theory of tempering chocolate. We also had a chocolate tasting, sampling everything from pure cocoa butter and cocoa solids to an assortment of white, dark and milk chocolates. To top things off, the marketing teams for Callebaut, Cacao Barry and Van Leer had presentations about their products. (The Mona Lisa rep was apparently unavailable.)
Why temper chocolate? To give it a nice snap, a desirable mouth feel and a shiny surface. Well-tempered chocolate is also easier to work with and is less susceptible to ‘chocolate bloom’, a white powder or white streaks that show up on the surface of some chocolate, especially chocolate that has sat too long or gotten a little too warm. And that means it has a longer shelf life, which for anyone making, and especially selling, chocolates is very important.
Tempering chocolate is all about the fat in the cocoa butter. The fat can form six different crystal structures, though one of them only develops over many months or under pressure. Of the five remaining structures, the only one that is solid at room temperature is called Beta 5. (Some of the scientific literature on chocolate mentions a seventh crystal structure for cocoa butter fat, but like the sixth form, it may not occur naturally as chocolate cools.)
So, tempering is the process by which the cocoa butter fat is encouraged to crystallize primarily in the Beta 5 form.
If you let fully melted chocolate cool, all five crystal forms will appear. So the trick is to let the chocolate cool a bit, then heat it back up to the point where crystal forms 1–4 all melt, leaving only a small amount of the Beta 5 crystal structure. 1% is the target level, that’s high enough that as the chocolate cools down again there’s enough Beta 5 crystals to encourage the cooling fat to form that structure rather than one of the other four, but not so much that it forms that structure quickly, which gives the chocolatier time to work with the chocolate.
You can also bypass the cool-then-reheat cycle by introducing some tempered chocolate or cocoa butter (sometimes called silk) that is already in the Beta 5 structure into the warm chocolate, thus ‘seeding’ the crystal structure.
With the theoretical stuff over, we got to start working in the lab.

We used both tempering methods in class, starting with the classical method of cooling the chocolate while working it then reheating it.
Monday afternoon was spent practicing forming well-tempered chocolate, first by working the cooling chocolate on a marble surface, then putting it back in the warmer to melt out the unwanted cocoa butter in structures 1–4, leaving us with a pan full of well-tempered chocolate. We did this several times.

This picture shows about 7 pounds of dark chocolate, cooling before being worked and put back into the warmer.
Then we got to try it using the seed method, which is a lot less messy, though some purists think it doesn’t make chocolate that is as well-tempered.
We also spent some time learning the right ways to fill chocolate molds, made a few simple molded shells and candies and then spent some time dipping chocolates, a skill that our instructor, Chef Russ Thayer, made look oh so simple, but keeping a small square of chocolate or ganache from falling off the dipping fork into a big tub of warm chocolate is not easy!
By the time we finished up, a little after 5PM, I was thoroughly worn out. I actually fell asleep during Monday Night Football, and as a football fanatic, that’s truly unusual for me!
Part 2 of this report will cover Days 2 and 3.

Home › Forums › My Week at Chocolate Boot Camp — Day 1
Tagged: chocolate academy tempering