Home › Forums › Baking — Breads and Rolls › Rosetta Roll Experiments
- This topic has 17 replies, 4 voices, and was last updated 5 years ago by
Mike Nolan.
-
AuthorPosts
-
May 28, 2021 at 2:03 pm #30062
I first attempted Rosetta Rolls the fourth week of October 2020, and I wrote about it in that thread. However, these are tricky enough that I want to give them their own thread, so I am doing so for this second attempt.
I mixed up the Biga on Thursday, May 27 at 8:45 p.m. This time, I put it in the 4-qt. dough bucket. After an hour, I refrigerated it overnight. I used only Bob’s Red Mill Artisan Bread flour. (The recipe calls for bread flour, preferably high gluten.) The temperature in the house was 75F. The rise in the first hour was not as dramatic as when I used half of the BRM and half KA AP, but it was still strong. Overnight, the biga stayed right at the 2-qt. line.
May 28, 2021 at 2:07 pm #30063After 13 ½ hours, I removed the biga and put it in a bowl. I added the water, per the directions. I found it difficult to break up the biga into the water with the rubber spatula. I wonder if it would be easier to break it up before adding the water, or if it would still be a problem. I did manage to get most of the water incorporated, and to get the dough into globs. I put it into the bread machine, then added the remaining ingredients on top and let the dough cycle do the mixing and kneading. I then moved it to a 2-qt. oiled container for 40 minutes. (Room temperature 70F) That resting time was closer to 55 minutes, as I did not have my shaping area set up.
My husband became unexpectedly chatty about this time, and I finally had to tell him that I could not concentrate on the task at hand and carry on a conversation. (That is one of the failings of the open concept kitchen.) He decided to go work in the shed.
The dough was very slack but easier to work with than last time. Once I folded it over, I was able to shape it into a rough rectangle 24x18 cm. After I cut it into four on the long 24 side, it was closer to 21cm wide, so I cut it into threes the other way. I pulled the pieces apart. They need to be set far apart from each other, or they will spread out and into each other while the baker shapes them one at a time. I had them on a silicone mat. I shaped each roll by folding it in on the bottom, then rolling it with the flat of my hand before cupping my fingers around it to make the smooth ball. Mindful of the problems I had last time when transferring the stamped rolls, I sprayed a wide silicone spatula with cooking spray, wiped it with a paper towel, then sprayed the stamp with the cooking spray and wiped it. That made it easy for the stamp to separate from the dough and for me to flip the stamped roll onto a floured baking sheet. I had to reapply the spray on the stamp and wipe it every four rolls. I wiped the silicone spatula with the paper towel with spray after each time. I decided to use a USA half-sheet pan this time rather than my rimless pan to keep the flour off the oven floor once I bake. These may be a bit too close together, but I only realized that after I had them on the pan. Next time, I may use two USA half-sheet pans. I put the pan, covered with lightly sprayed saran into the refrigerator. The rolls rest there for at least 3 hours and up to 8 hours. I plan to bake them after 3 ½ hours.
Last time, I baked them on the third rack up. I am going to try the second rack this time.
May 28, 2021 at 2:54 pm #30064I remember when there was a thread on the old BC about these rolls. All crust and hollow on the inside if I remember right. There was a lot of discussion about finding/buying the right cutter. So did you find an authentic one Baker Aunt? I saw a post from Mike about his son making on with his 3D printer. My son was a machinist before he got his engineering degree and also has a 3D printer if that would be of use to anyone.
May 28, 2021 at 3:30 pm #30067Janiebakes--That thread was saved and is here at Nebraska Kitchen:
My Rosetta Stamp was gifted to me by Cass, along with a xerox of the recipe from a Daniel Leader bread book that is out of print. I promised him that I would work to perfect the recipe and report my results to him. I decided also to post about it here.
Cass recalls these rolls from his childhood. His mother would buy them and make egg, onion, and pepper sandwiches which they would eat at the seaside. He says that the salt air added special flavor.
When I baked them in October, I produced delicious rolls, but they did not have the "hole" the stamp is supposed to produce. I would bake them just for the flavor, but I would like to figure out how to use the stamp so that the hole appears. If I achieve that, there will be pictures posted.!
May 28, 2021 at 5:41 pm #30068Can you post a picture of the stamp you have?
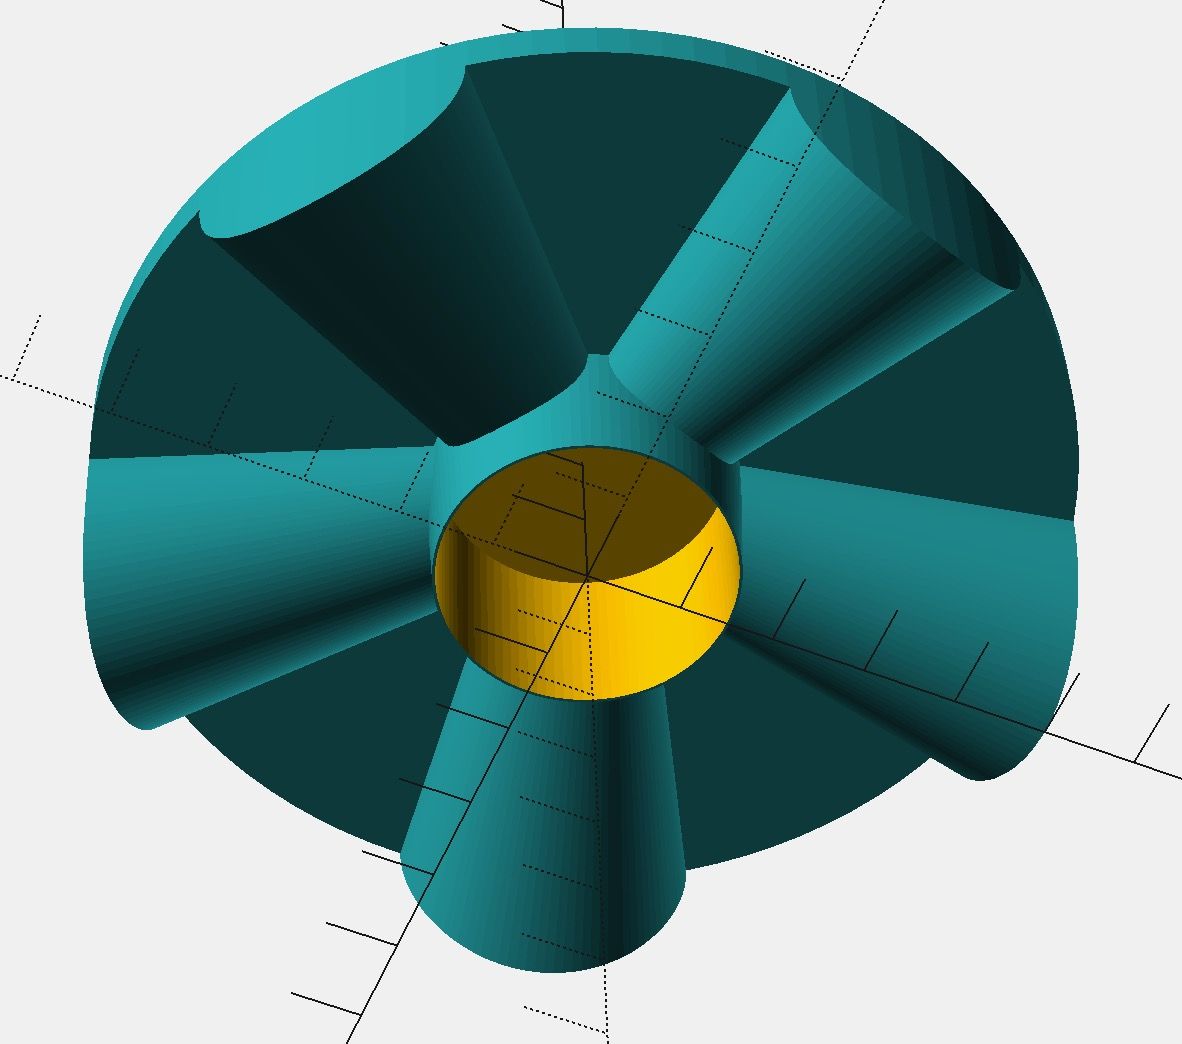
Here's one of the views my son sent me of the stamp he's working on, modeled on a photo of a metal one I sent him. The challenge is the handle, you either have to use a lot of dissolving material or make two pieces and put them together somehow. He was working on making the cones smaller at the center.
The recipe in Italian in that old thread is one I tried several times, but without a stamp I never got anything close to a hollow center. (I tried ice cubes in the middle, butter in the middle and a few other ideas.) The rolls were delicious even without a hollow center
Attachments:
You must be logged in to view attached files.May 28, 2021 at 6:27 pm #30072Here is my report. Alas, there were no holes, but the rolls are delicious.
I took the rolls out of the refrigerator 20 minutes before baking. To turn the rolls over, I used a small silicone spatula lightly coated with cooking spray. These rolls held their shape much better than in my first attempt last October. I am convinced that bread flour is important for that. However, I did not see much indication of the impression when I turned them. Once I put them in the oven, some of the lines were clearer, but as with last time, there were no standouts. Baking time is 10-15 minutes at 500F, until they are “the color of sand,” which is not a helpful description. I baked for 11 minutes until some browning appeared on the tops.
We waited the recommended 15 minutes, then sat down to dinner. We used them for sandwiches with warmed up leftover boneless pork chops. I had one, and my husband had two. Alas, the famous hole was not there in any of these rolls. However, the taste and texture is as wonderful as I remember it: the interior is soft, with a chewy crust.
What will I change next time? I will use two baking sheets and bake them separately, six to a pan, as a couple slightly baked into the ones next to them. That would put them two inches apart, as the recipe specifies. I am wondering if I should consider using some high gluten flour.
I think, however, that there must be a technique to forming the balls of dough and using the stamp that I have not yet discovered. Daniel Leader, whose recipe I am following, says, “round each piece into a tight ball (see Shaping Rolls, p. 37). Stamp each piece with the roll stamp.” Cass sent me a xerox of the recipe, as the book, Local Breads is out of print, but that is pages 226-229. I have no idea what is on p. 37, and if it is the standard roll shaping. Leader says that “a combination of steam and heat inflates the small rounds of dough and creates an air pocket in the center.
I could try baking with the convection setting, maybe at 475F? By the way, when I took out the rolls, it set off the smoke detector in the dining area. Next time, I will turn on the stove hood fan to prevent it; the poor dog streaked up the stairs at the high-pitched sound.
May 28, 2021 at 6:32 pm #30073Mike, I took some pictures of the stamp. I will see if I can figure out how to post them.
May 29, 2021 at 7:44 am #30079It turns out that posting a picture may take a while, as I will need to figure out how to get it off the camera now that the software that came with the camera no longer works with the current Windows. (Clearly, I have been remiss in actually doing anything with all the pictures on the camera, as I am only just discovering this fact.) My husband and I will work on it--we might get lucky even though neither of us is techy--otherwise, my elder stepson is coming for a visit in June, and he probably knows what to do.
May 29, 2021 at 11:12 am #30080If the camera has a SDHC chip and your computer has a chip reader, you might be able to read them that way. That's how we get the pictures off our outdoor critter camera, as it is much faster than trying to do it via a wireless network connection that isn't very stable. (I like the critter camera pictures, the camera software not so much.)
May 29, 2021 at 8:32 pm #30085Whart wonderful memories that thread brought back Baker Aunt. Just in case you haven' seen it here is a link to a post on fresh loaf and Facebook. The poster feels that running the dough through a pasta machine is important to getting the hollow middle. You can see the pictures even if you have no FB account. https://www.thefreshloaf.com/node/35818/pane-soffiato-getting-hollow-rosetta-and-tartaruga-rolls.
May 30, 2021 at 8:00 am #30088I had never heard of these rolls, BakerAunt,, so I'm glad you're keeping us updated on your adventure. I wish you success. Thanks, Mike & Janiebakes, for posting pictures of the cutter & a finished product. It would be an interesting roll to eat with a hollow center. Is that what you're trying to achieve, BakerAunt, a hollow center?
May 30, 2021 at 11:48 am #30094Thanks for sharing the post and pictures, Janiebakes. Somehow, those rolls do not look like what I was expecting. I anticipate a "hole" but not that the entire roll would be empty. These rolls are so much work that if I had to add a pasta machine to roll them out, then I would resign myself to not having the holes and just enjoying them as they are.
The part of the post that I will think about is the need for a taut dough ball. This dough is VERY springy, and the instructions say nothing about degassing it thoroughly, just pat into a rough rectangle and divide into 12 pieces. It may be that the rolls do not retain the print because the dough is so springy.
May 30, 2021 at 1:51 pm #30095I don't think they're supposed to be THAT hollow, but there's probably a large variance from one baker to another.
May 30, 2021 at 2:10 pm #30096Here is what Leader says: Italian bakers are judged on the size of the hollow (my best rolls have had air pockets the size of a golfball" [sic]).
He also says it is a "very stiff, extremely active dough." Certainly the BRM artisan bread flour made for a more manageable dough than half KABC AP and half the BRM artisan bread flour, although I would not necessarily call it stiff.
He does specify "unbleached bread flour preferably high-gluten." I am wondering about trying the KABC high-gluten flour.
May 30, 2021 at 8:05 pm #30104"These rolls are so much work that if I had to add a pasta machine to roll them out, then I would resign myself to not having the holes and just enjoying them as they are"
. I definitely saw how much work you are doing. I am enjoying watching your experiment but as of now, have no plans to try it. You never know though......
-
AuthorPosts

- You must be logged in to reply to this topic.